

Creating Crawlers
Creating Web Crawlers
Section titled “Creating Web Crawlers”Setting up a web crawler is the first step to building your AI assistant’s knowledge base. This guide walks you through creating and configuring your first crawler.
Before You Start
Section titled “Before You Start”What You’ll Need:
- Your website’s main URL (e.g.,
yourcompany.com- no need for https://) - Access to your SiteAssist project
- Time for initial crawl (1 minute per ~300 pages)
Permissions Required:
- Your website must be publicly accessible
- No password protection on pages you want crawled
- Standard robots.txt compliance (SiteAssist respects crawling rules)
Step-by-Step Guide
Section titled “Step-by-Step Guide”1. Access Web Crawlers
Section titled “1. Access Web Crawlers”Navigate to your project and click on Web Crawlers in the sidebar.
2. Create New Crawler
Section titled “2. Create New Crawler”Click the Add Crawler button to open the crawler creation modal.
3. Basic Configuration
Section titled “3. Basic Configuration”Fill in the essential crawler settings:
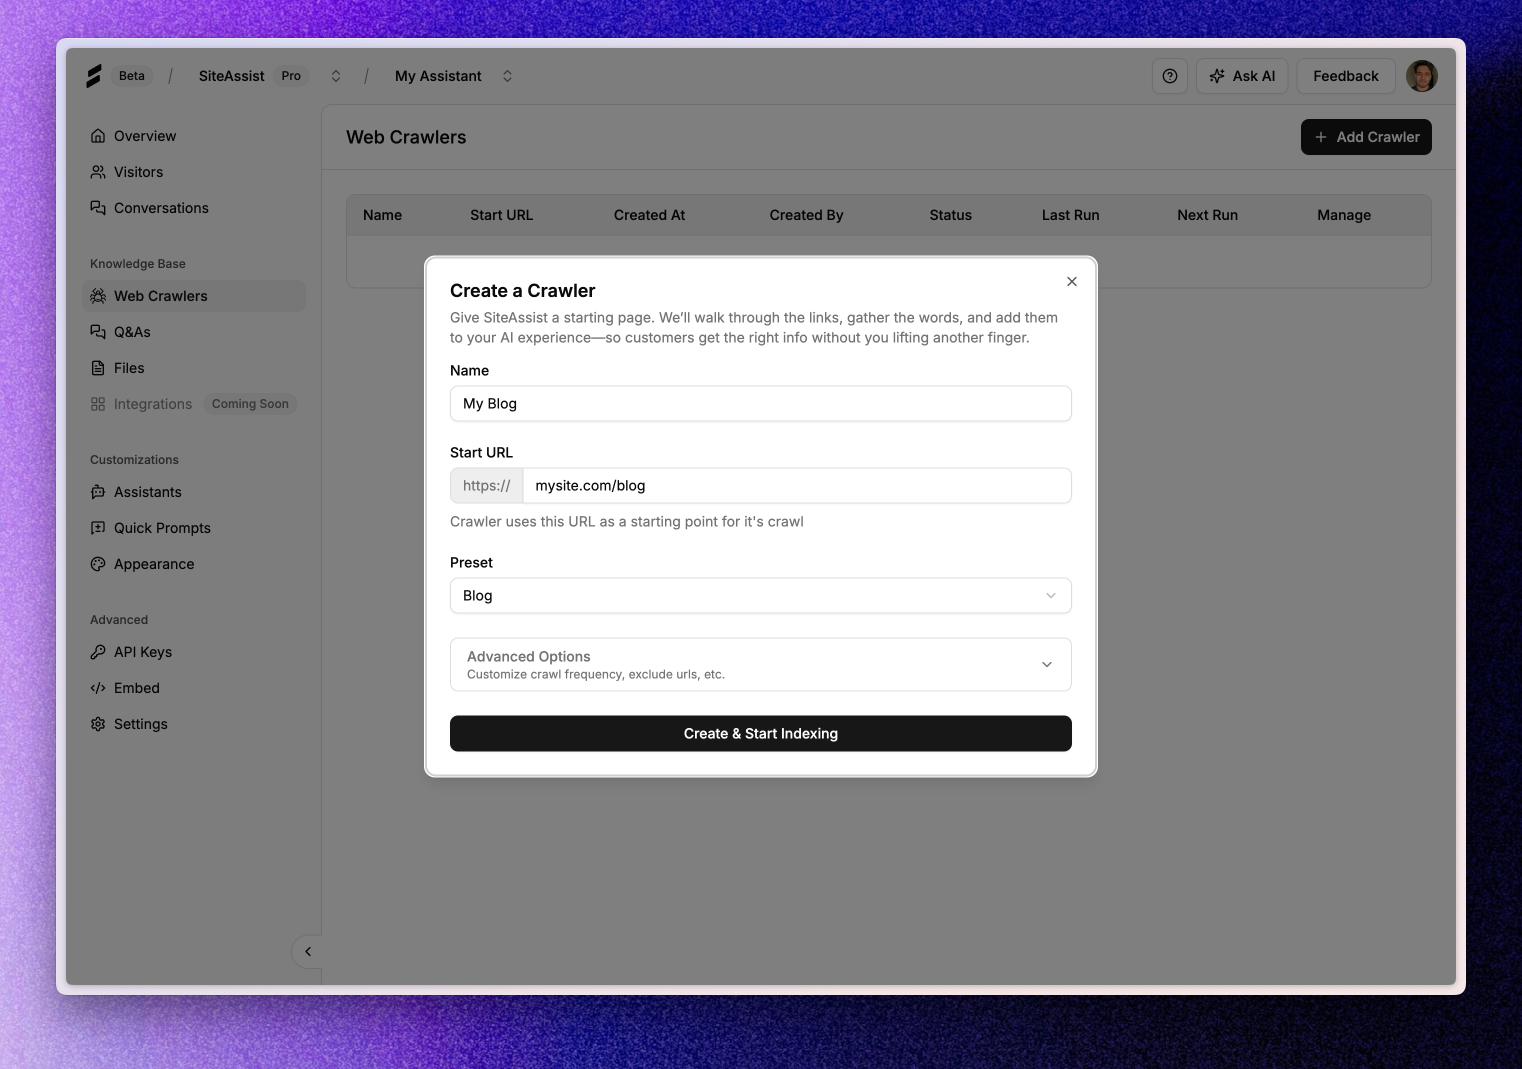
Give your crawler a descriptive name for easy identification.
Good examples:
- “Main Company Website”
- “Help Documentation”
- “Product Catalog”
- “Marketing Site”
Avoid:
- Generic names like “Crawler 1”
- Special characters or symbols
Start URL
Section titled “Start URL”Enter your website’s main URL where crawling should begin.
Format Requirements:
- The input field has
https://prefix automatically added - Just enter your domain without the protocol
- Can be a specific section starting point
Examples:
yourcompany.comdocs.yourcompany.comyourcompany.com/products
Smart Discovery: The crawler automatically checks for sitemaps at
/sitemap.xmland/sitemap-index.xmlto discover pages more efficiently.
Preset Selection
Section titled “Preset Selection”Choose the preset that best matches your website type:
Website
- Best for: Business websites, marketing sites, general content
- Optimized for: Customer support, general inquiries
- Recommended for most users
Documentation
- Best for: Help centers, technical docs, API documentation
- Optimized for: Detailed explanations, technical support
- Maintains content hierarchy and structure
Blog
- Best for: News sites, blogs, content marketing sites
- Optimized for: Article content, publication information
- Handles date-based content organization
E-commerce (Coming Soon)
- Best for: Online stores, product catalogs
- Will optimize for: Product information, pricing, descriptions
Not sure which preset to choose? Start with “Website” - it works well for most business sites and you can always create additional crawlers with different presets later.
4. Start Crawling
Section titled “4. Start Crawling”Once you’ve configured the basic settings:
- Review your configuration
- Click Create & Start Indexing
- The crawler will immediately start working
What Happens Next
Section titled “What Happens Next”Immediate Actions
Section titled “Immediate Actions”- Crawler status changes to “Crawling”
- Initial page discovery begins
- Progress indicators show crawling activity
- Crawler logs starts showing live logs.
During Crawling (1-5+ minutes typically)
Section titled “During Crawling (1-5+ minutes typically)”- Pages are discovered and queued
- Content is extracted and processed
- Progress logs show real-time activity
- You can monitor status in the crawler dashboard
Processing Times:
- ~300 pages: ~1 minute
- ~600 pages: ~5 minutes
- Larger sites: Time scales proportionally
After Completion
Section titled “After Completion”- Status changes to “Completed”
- Indexed content count is displayed
- Your AI assistant can now use this knowledge
- Automatic scheduling begins (if configured)
Managing Your Crawler
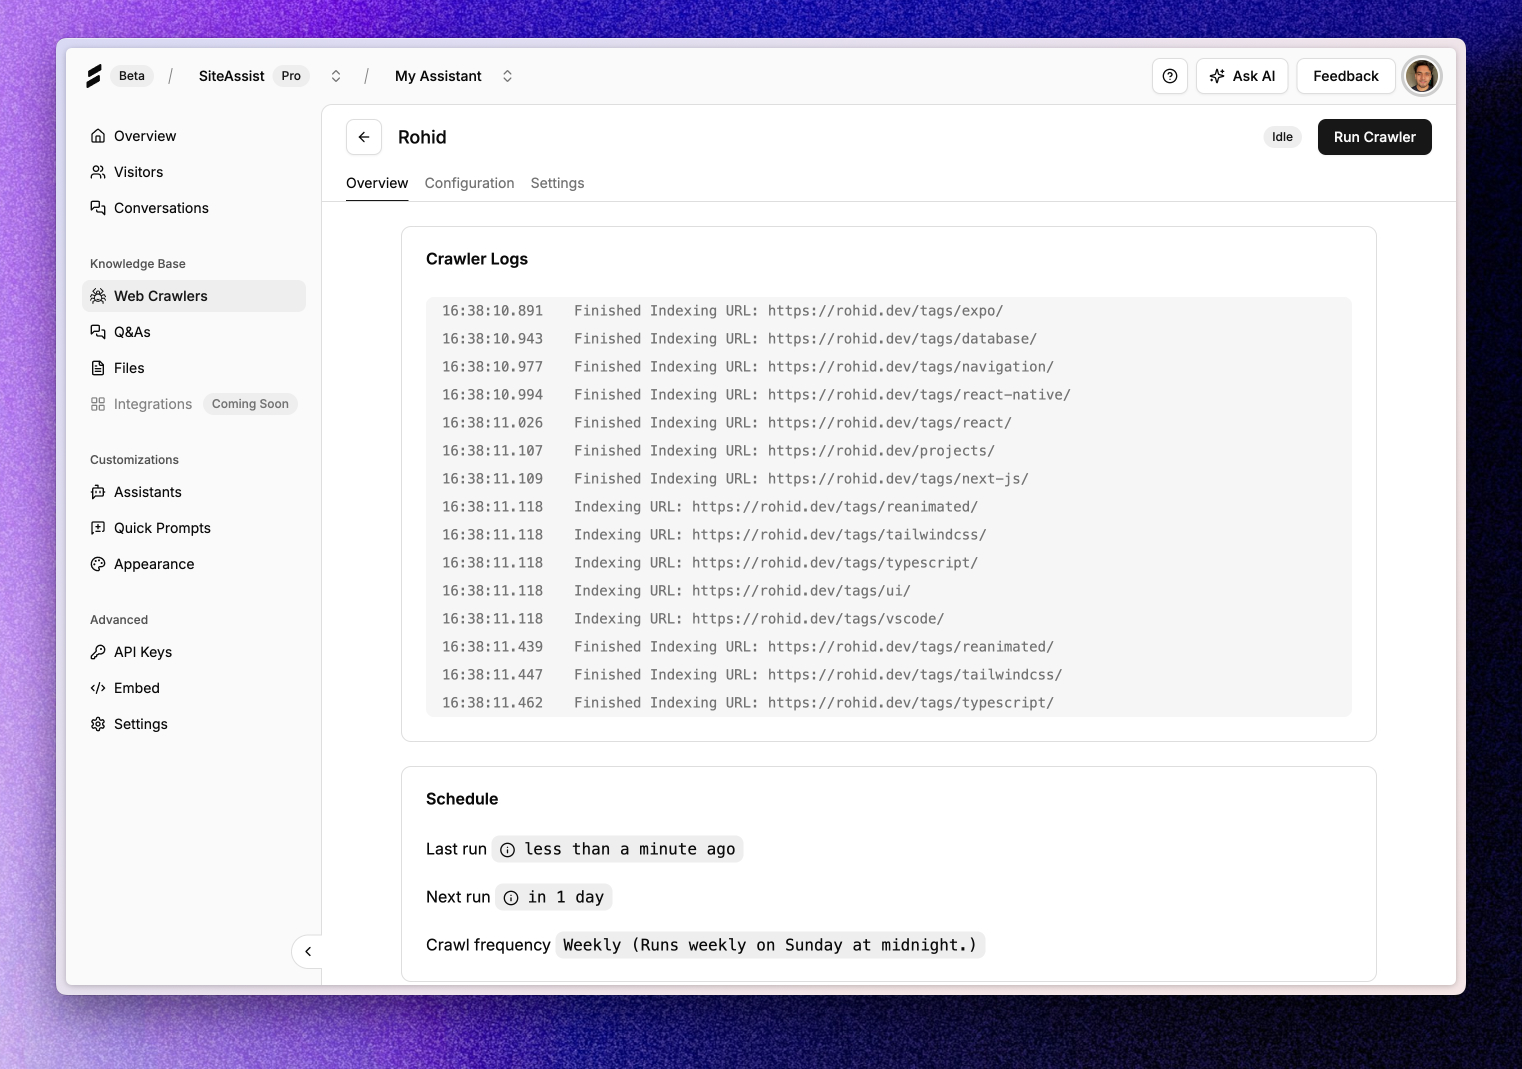
Section titled “Managing Your Crawler”Once created, each crawler has a dedicated page with three tabs for complete management:
Overview Tab
Section titled “Overview Tab”- Real-time crawling status and progress
- Total pages discovered and indexed
- Crawling logs and activity history
- Performance metrics and statistics
Configuration Tab
Section titled “Configuration Tab”- Modify advanced crawler settings
- Update start URL if needed
- Adjust URL exclusion rules
- Change crawling frequency and scheduling
Settings Tab
Section titled “Settings Tab”- View crawler ID and technical details
- Access crawler management options
- Delete crawler (permanent action)
Monitoring Your New Crawler
Section titled “Monitoring Your New Crawler”While your crawler runs, you can:
View Progress
- See pages being processed in real-time
- Monitor crawling speed and efficiency
- Check for any errors or issues in the logs
Test Integration
- Try asking your AI assistant questions
- Verify responses use your website content
- Check accuracy and relevance
Common First-Time Issues
Section titled “Common First-Time Issues”Crawler Stuck or Slow
Section titled “Crawler Stuck or Slow”- Cause: Large website or slow server response
- Solution: Be patient; crawling can take time for large sites
- When to worry: If no progress after 30 minutes
Low Page Count
Section titled “Low Page Count”- Cause: Limited internal linking or restricted access
- Solution: Check your website’s internal link structure
- Alternative: Use sitemap URL as start URL
Missing Important Pages
Section titled “Missing Important Pages”- Cause: Pages not linked from main navigation
- Solution: Check advanced configuration options
Permission Errors
Section titled “Permission Errors”- Cause: Password-protected or restricted content
- Solution: Ensure pages are publicly accessible
Next Steps
Section titled “Next Steps”Once your crawler is running successfully:
- Configure advanced settings for more control
- Test your AI assistant with questions about your website content
- Consider additional crawlers for different sections or content types
Need Help?
Section titled “Need Help?”Having trouble with crawler setup?
- Check our troubleshooting guide
- Email us: support@siteassist.io
- We can help analyze your website structure and recommend optimal settings
Want advanced features?
- See our crawler configuration guide
- Learn about URL exclusion rules and custom scheduling